

一番最新のLinux Foundation CKA試験問題集PDFには2026年更新
100%無料Kubernetes Administrator CKA問題集PDFお試しサンプル認定ガイドがカバーされます
Linux FoundationのCKAプログラム試験は、プロダクション環境でKubernetesクラスターを展開し管理する責任があるシステム管理者、DevOpsエンジニア、およびITプロフェッショナル向けに設計されています。この認定試験は、業界で最も人気のあるコンテナオーケストレーションツールの1つであるKubernetesにおける専門知識を証明するのに役立ちます。
質問 # 46
List all the pods sorted by name
正解:
解説:
kubect1 get pods --sort-by=.metadata.name
質問 # 47
Create a deployment named "myapp" that having 2 replicas with
nginx image and expose deployment as service named "myservice"
- A. // Create a YAML Template
kubectl create deploy myapp --image=nginx --dry-run -o yaml >
myapp.yaml
//Update replicas=2 in myapp.yaml file
apiVersion: apps/v1
kind: Deployment
metadata:
labels:
app: myapp
name: myapp
spec:
replicas: 2
selector:
matchLabels:
app: myapp
template:
metadata:
labels:
app: myapp
spec:
containers:
- image: nginx
name: nginx
// Create deployment
kubectl create -f myapp.yaml
// Creating YAML template for service
kubectl expose deployment myapp --type=ClusterIP --port=60 --
target-port=60 --name=myservice --dry-run -o yaml >
myservice.yaml
YAML File:
apiVersion: v1
kind: Service
metadata:
labels:
app: myapp
name: myservice
spec:
ports:
- port: 60
protocol: TCP
targetPort: 80
selector:
app: myapp
type: ClusterIP
kubectl get svc
NAME TYPE CLUSTER-IP EXTERNAL-IP PORT(S)
AGE
kubernetes ClusterIP 10.2.0.1 <none> 443/TCP
158d
myservice ClusterIP 10.2.96.175 <none> 80/TCP
40s - B. // Create a YAML Template
kubectl create deploy myapp --image=nginx --dry-run -o yaml >
myapp.yaml
//Update replicas=2 in myapp.yaml file
apiVersion: apps/v1
kind: Deployment
metadata:
labels:
app: myapp
name: myapp
spec:
replicas: 2
selector:
matchLabels:
app: myapp
template:
metadata:
labels:
app: myapp
spec:
containers:
- image: nginx
name: nginx
// Create deployment
kubectl create -f myapp.yaml
// Creating YAML template for service
kubectl expose deployment myapp --type=ClusterIP --port=80 --
target-port=80 --name=myservice --dry-run -o yaml >
myservice.yaml
YAML File:
apiVersion: v1
kind: Service
metadata:
labels:
app: myapp
name: myservice
spec:
ports:
- port: 80
protocol: TCP
targetPort: 80
selector:
app: myapp
type: ClusterIP
kubectl get svc
NAME TYPE CLUSTER-IP EXTERNAL-IP PORT(S)
AGE
kubernetes ClusterIP 10.2.0.1 <none> 443/TCP
158d
myservice ClusterIP 10.2.96.175 <none> 80/TCP
40s
正解:B
質問 # 48
Create a redis pod and mount "redis-config" as "redis.conf"
inside redis container, name the config volume as "redis-volume"
redis-config path - /opt/redis-config
- A. 0
- B. 1
- C. Pending
正解:C
質問 # 49
Create a Job with an image node which prints node version and
verifies there is a pod created for this job
- A. kubectl create job nodeversion --image=node -- node -v
kubectl get job -w
kubectl get pod
YAML File:
apiVersion: batch/v1
kind: Job
metadata:
labels:
job-name: nodeversion
name: nodeversion
spec:
completions: 1
parallelism: 1
labels:
job-name: nodeversion
spec:
containers:
- command:
- node
- -v
image: node
imagePullPolicy: Always
name: nodeversion
restartPolicy: Never - B. kubectl create job nodeversion --image=node -- node -v
kubectl get job -w
kubectl get pod
YAML File:
apiVersion: batch/v1
kind: Job
metadata:
labels:
job-name: nodeversion
name: nodeversion
spec:
completions: 1
parallelism: 1
selector:
matchLabels:
job-name: nodeversion
template:
metadata:
labels:
job-name: nodeversion
spec:
containers:
- command:
- node
- -v
image: node
imagePullPolicy: Always
name: nodeversion
restartPolicy: Never
正解:B
質問 # 50
Verify certificate expiry date for ca certificate in /etc/kubernetes/pki
正解:
解説:
openssl x509 -in ca.crt -noout -text | grep -i validity -A 4
質問 # 51
Given a partially-functioning Kubernetes cluster, identify symptoms of failure on the cluster.
Determine the node, the failing service, and take actions to bring up the failed service and restore the health of the cluster. Ensure that any changes are made permanently.
You can ssh to the relevant I nodes (bk8s-master-0 or bk8s-node-0) using:
[student@node-1] $ ssh <nodename>
You can assume elevated privileges on any node in the cluster with the following command:
[student@nodename] $ | sudo -i
正解:
解説: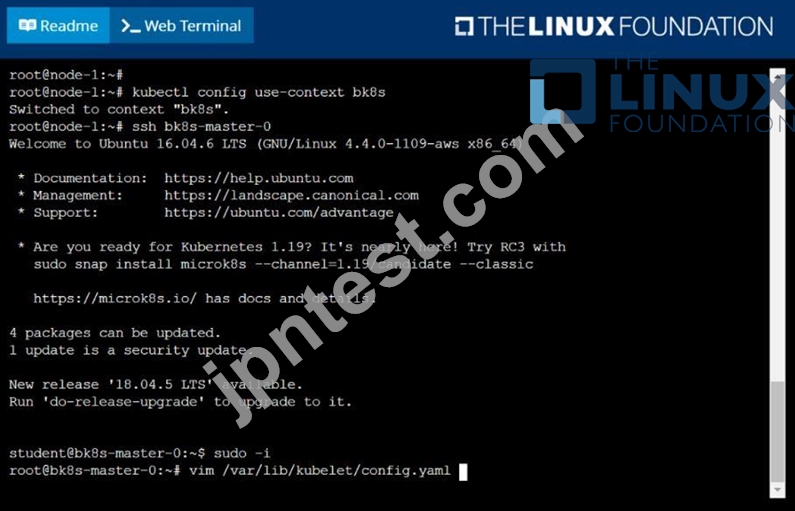


質問 # 52
Create a file:
/opt/KUCC00302/kucc00302.txt that lists all pods that implement service baz in namespace development.
The format of the file should be one pod name per line.
正解:
解説:
See the solution below.
Explanation
solution
F:\Work\Data Entry Work\Data Entry\20200827\CKA\11 B.JPG
F:\Work\Data Entry Work\Data Entry\20200827\CKA\11 C.JPG
F:\Work\Data Entry Work\Data Entry\20200827\CKA\11 D.JPG
質問 # 53
Score: 4%
Task
Create a persistent volume with name app-data , of capacity 1Gi and access mode ReadOnlyMany. The type of volume is hostPath and its location is /srv/app-data .
正解:
解説:
Solution:
#vi pv.yaml
apiVersion: v1
kind: PersistentVolume
metadata:
name: app-config
spec:
capacity:
storage: 1Gi
accessModes:
- ReadOnlyMany
hostPath:
path: /srv/app-config
#
kubectl create -f pv.yaml
質問 # 54
Set CPU and memory requests and limits for existing pod name
"nginx-prod".
Set requests for CPU and Memory as 100m and 256Mi respectively
Set limits for CPU and Memory as 200m and 512Mi respectively
- A. kubectl get po
kubectl set resources po nginx-prod --
limits=cpu=200m,memory=512Mi --requests=cpu=100m,memory=256Mi
//Verify
kubectl describe po nginx-prod - B. kubectl get po
kubectl set resources po nginx-prod --
limits=cpu=200m,memory=512Mi --requests=cpu=100m,memory=256Mi
//Verify
kubectl top po
kubectl describe po nginx-prod
正解:B
質問 # 55
Check nodes which are ready and print it to a file /opt/nodestatus
- A. JSONPATH='{range .items[*]}{@.metadata.name}:{range
@.status.conditions[*]}{@.type}={@.status};{end}{end}' \
//Verify
cat /opt/node-status - B. JSONPATH='{range .items[*]}{@.metadata.name}:{range
@.status.conditions[*]}{@.type}={@.status};{end}{end}' \
&& kubectl get nodes -o jsonpath="$JSONPATH" | grep
"Ready=True" > /opt/node-status
//Verify
cat /opt/node-status
正解:B
質問 # 56
Create a pod as follows:
* Name: non-persistent-redis
* container Image: redis
* Volume with name: cache-control
* Mount path: /data/redis
The pod should launch in the staging namespace and the volume must not be persistent.
正解:
解説:
See the solution below.
Explanation
solution


質問 # 57
You are managing a Kubernetes cluster for a company with multiple teams working on different projects. You want to implement RBAC to ensure each team has access only to the resources they need.
正解:
解説:
See the solution below with Step by Step Explanation.
Explanation:
Team A (developers) needs to create and manage deployments, pods, and services in the "dev" namespace.
Team B (ops) needs to manage the cluster's overall health and can access all resources in all namespaces.
Team C (security) needs to audit and monitor all cluster activity but cannot modify any resources.
Create a YAML file to define the roles and role bindings to implement this RBAC setup.
Solution (Step by Step) :
1 . Create the "dev" namespace:
kubectl create namespace dev
2. Define the "dev-team" role:
3. Create the "dev-team" role binding:
4. Define the "ops-team" role: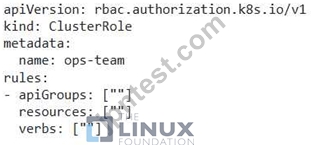
5. Create the "ops-team" role binding:
6. Define the "security-team" role:
7. Create the "security-team" role binding:
8. Apply the YAML file to the cluster: kubectl apply -f rbac-config.yaml
質問 # 58
Create a configmap called cfgvolume with values var1=val1,
var2=val2 and create an nginx pod with volume nginx-volume which
reads data from this configmap cfgvolume and put it on the path
/etc/cfg
- A. // first create a configmap cfgvolume
kubectl create cm cfgvolume --from-literal=var1=val1 --fromliteral=var2=val2
// verify the configmap
kubectl describe cm cfgvolume
// create the config map
kubectl create -f nginx-volume.yml
vim nginx-configmap-pod.yaml
apiVersion: v1
kind: Pod
- name: nginx-volume
configMap:
name: cfgvolume
containers:
- image: nginx
name: nginx
volumeMounts:
- name: nginx-volume
mountPath: /etc/cfg
restartPolicy: Always
k kubectl apply -f nginx-configmap-pod.yaml
/ // Verify
// exec into the pod
kubectl exec -it nginx -- /bin/sh
// check the path
cd /etc/cfg - B. // first create a configmap cfgvolume
kubectl create cm cfgvolume --from-literal=var1=val1 --fromliteral=var2=val2
// verify the configmap
kubectl describe cm cfgvolume
// create the config map
kubectl create -f nginx-volume.yml
vim nginx-configmap-pod.yaml
apiVersion: v1
kind: Pod
metadata:
labels:
run: nginx
name: nginx
spec:
volumes:
- name: nginx-volume
configMap:
name: cfgvolume
containers:
- image: nginx
name: nginx
volumeMounts:
- name: nginx-volume
mountPath: /etc/cfg
restartPolicy: Always
k kubectl apply -f nginx-configmap-pod.yaml
/ // Verify
// exec into the pod
kubectl exec -it nginx -- /bin/sh
// check the path
cd /etc/cfg
正解:B
質問 # 59
Score: 4%
Task
Scale the deployment presentation to 6 pods.
正解:
解説:
Solution:
kubectl get deployment
kubectl scale deployment.apps/presentation --replicas=6
質問 # 60
Schedule a pod as follows:
* Name: nginx-kusc00101
* Image: nginx
* Node selector: disk=ssd
正解:
解説:
See the solution below.
Explanation
solution


質問 # 61
You are deploying a new microservice to your Kubernetes cluster. This service needs to communicate with another service within the same cluster. You want to ensure that the communication between the two services is secure and reliable. Which container network interface plugin would you choose for this scenario and why?
正解:
解説:
See the solution below with Step by Step Explanation.
Explanation:
Solution (Step by Step) :
1 . Choose the appropriate Container Network Interface Plugin:
- For secure and reliable communication between services within the same Kubernetes cluster, the Calico container network interface plugin is a recommended choice.
2. Reasons for choosing Calico:
- Security: Calico provides robust network security features like network policies that allow you to define fine- grained access control rules between pods and services. This ensures secure communication only between authorized entities.
- Reliability: Calico offers high availability and reliability. It uses a distributed architecture and supports BGP for efficient routing and load balancing, leading to resilient network connectivity.
- Ease of Use: Calico integrates seamlessly with Kubernetes and is easy to configure and manage.
- Scalability: It's highly scalable, enabling you to manage large and complex Kubernetes environments.
3. Example Implementation:
- Install Calico: Use the 'kubectl' command to install Calico on your Kubernetes cluster:
kubectl apply -f https://docs.projectcalico.org/v3.19/getting-
started/kubernetes/installation/l .8+/manifests/calico.yaml
- Define Network Policies: Create network policies to control communication between your services. Here's an example:
This policy allows pods labeled 'app: microservice? to communicate with pods labeled 'app: microservice? within the 'default' namespace. 4. Verify the Configuration: - Use 'kubectl get networkpolicies' to list the defined network policies. - Test communication between your services. Note: Calico is a popular and highly regarded choice for Kubernetes networking. However, other plugins like Flannel and Weave are also viable options, depending on your specific requirements and preferences. ,
質問 # 62
Score:7%
Task
Create a new PersistentVolumeClaim
* Name: pv-volume
* Class: csi-hostpath-sc
* Capacity: 10Mi
Create a new Pod which mounts the PersistentVolumeClaim as a volume:
* Name: web-server
* Image: nginx
* Mount path: /usr/share/nginx/html
Configure the new Pod to have ReadWriteOnce access on the volume.
Finally, using kubectl edit or kubectl patch expand the PersistentVolumeClaim to a capacity of 70Mi and record that change.
正解:
解説:
Solution:
vi pvc.yaml
storageclass pvc
apiVersion: v1
kind: PersistentVolumeClaim
metadata:
name: pv-volume
spec:
accessModes:
- ReadWriteOnce
volumeMode: Filesystem
resources:
requests:
storage: 10Mi
storageClassName: csi-hostpath-sc
# vi pod-pvc.yaml
apiVersion: v1
kind: Pod
metadata:
name: web-server
spec:
containers:
- name: web-server
image: nginx
volumeMounts:
- mountPath: "/usr/share/nginx/html"
name: my-volume
volumes:
- name: my-volume
persistentVolumeClaim:
claimName: pv-volume
# craete
kubectl create -f pod-pvc.yaml
#edit
kubectl edit pvc pv-volume --record
質問 # 63
Task Weight: 4%
Task
Scale the deployment webserver to 3 pods.
正解:
解説:
Solution:
質問 # 64
You are running a Kubernetes cluster with a critical application that requires high availability and resilience. You have a Deployment named 'web-app' with multiple replicas. Your current DNS setup relies on external DNS providers, but you want to implement CoreDNS within your cluster to enhance DNS resolution performance and reliability. You need to configure CoreDNS to resolve DNS queries for services within the cluster and for external domains.
正解:
解説:
See the solution below with Step by Step Explanation.
Explanation:
Solution (Step by Step) :
1 Create a CoreDNS ConfigMap:
- Create a ConfigMap named coredns' containing the CoreDNS configuration. You can use a basic configuration file or a more complex one tailored to your specific needs.
2. Deploy CoreDNS: - Deploy CoreDNS as a Deployment using the 'coredns' ConfigMap.
3. Configure Services for DNS Resolution: - Create a Service named 'coredns' of type 'ClusterlP' that exposes the CoreDNS Deployment on the cluster network.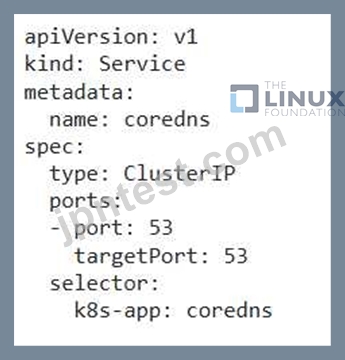
4. Update Cluster DNS Configuration: - Modify the 'kube-system namespace 'ConfigMap' named 'cluster-dns' to point to the 'coredns' Service for DNS resolution.
5. Verify CoreDNS Functionality: - Use 'kubectl exec -it -- sh -c "nslookup ..svc.cluster.local"' to test DNS resolution for services within the cluster. - Use "kubectl exec -it sh -c "nslookup example.com"' to test DNS resolution for external domains. - If everything is configured correctly, CoreDNS should successfully resolve DNS queries.
質問 # 65
List all the pods that are serviced by the service "webservice" and copy the output in /opt/$USER/webservice.targets Note: You need to list the endpoints
正解:
解説:
kubectl descrive svc webservice | grep -i "Endpoints" > /opt/$USER/webservice.targets kubectl get endpoints webservice > /opt/$USER/webservice.targets
質問 # 66
......
更新されたのはLinux Foundation CKA問題集PDFオンラインエンジン:https://www.jpntest.com/shiken/CKA-mondaishu
PDF試験材料は2026年最新の実際に出るCKA問題集:https://drive.google.com/open?id=1-mK9MSyP6aI4dtheg4kqICGqqS6lMYfl