![]()
無料で使えるEX294日本語試験ブレーン問題集認定ガイド問題と解答
EX294日本語認定概要最新のEX294日本語のPDF問題集
質問 # 18
Create a file called packages.yml in /home/sandy/ansible to install some packages for the following hosts. On dev, prod and webservers install packages httpd, mod_ssl, and mariadb. On dev only install the development tools package. Also, on dev host update all the packages to the latest.
正解:
解説:
Solution as: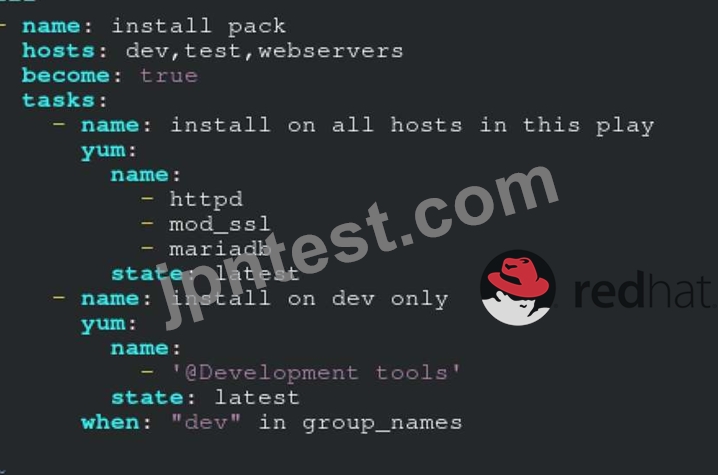
** NOTE 1 a more acceptable answer is likely 'present' since it's not asking to install the latest
state: present
** NOTE 2 need to update the development node
- name: update all packages on development node
yum:
name: '*'
state: latest
質問 # 19
Modify file content.
------------------------
Create a playbook called /home/admin/ansible/modify.yml as follows:
* The playbook runs on all inventory hosts
* The playbook replaces the contents of /etc/issue with a single line of text as
follows:
--> On hosts in the dev host group, the line reads: "Development"
--> On hosts in the test host group, the line reads: "Test"
--> On hosts in the prod host group, the line reads: "Production"
正解:
解説:
Solution as:
# pwd
/home/admin/ansible
# vim modify.yml
---
- name:
hosts: all
tasks:
- name:
copy:
content: "Development"
dest: /etc/issue
when: inventory_hostname in groups['dev']
- name:
copy:
content: "Test"
dest: /etc/issue
when: inventory_hostname in groups['test']
- name:
copy:
content: "Production"
dest: /etc/issue
when: inventory_hostname in groups['prod']
:wq
# ansible-playbook modify.yml --syntax-check
# ansible-playbook modify.yml
質問 # 20
ansibleをインストールして構成する
ユーザーsandyは、適切な権限でコントロールノードに作成されています。sshキーを変更または変更しないでください。制御ノードでansibleを実行するために必要なパッケージをインストールします。 ansible.cfgをフォルダー/home/sandy/ansible/ansible.cfgに配置するように構成し、sandyユーザーを介してリモートマシンにアクセスするように構成します。すべてのロールはパス/ home / sandy / ansible / rolesにある必要があります。インベントリパスは/ home / sandy / ansible / invenloryにある必要があります。
5つのノードにアクセスできます。
node1.example.com
node2.example.com
node3.example.com
node4.example.com
node5.example.com
これらのノードを、ノードIがグループdevのメンバーであるインベントリファイルに含めるように構成します。 nodc2はグループテストのメンバー、node3はグループプロキシのメンバー、nodc4とノード5はグループprodのメンバーです。また、prodはグループWebサーバーのメンバーです。
- A. In/home/sandy/ansible/ansible.cfg
[defaults]
inventory=/home/sandy/ansible/inventory
roles_path=/home/sandy/ansible/roles
remote_user= sandy
host_key_checking=false
[privilegeescalation]
become=true
become_user=root
become_ask_pass=false
In /home/sandy/ansible/inventory
[dev]
node 1 .example.com
[test]
node2.example.com
node4.example.com
node5 .example.com
[webservers:children]
prod - B. In/home/sandy/ansible/ansible.cfg
[defaults]
inventory=/home/sandy/ansible/inventory
roles_path=/home/sandy/ansible/roles
remote_user= sandy
host_key_checking=false
[privilegeescalation]
become=true
become_user=root
become_method=sudo
become_ask_pass=false
In /home/sandy/ansible/inventory
[dev]
ノード1.example.com
[テスト]
node2.example.com
[プロキシ]
node3 .example.com
[製品]
node4.example.com
node5 .example.com
[webservers:children]
製品
正解:B
質問 # 21
次のように、ローカルマシンのhome / bob / ansibleにspecs.emptyというファイルを作成します。
HOST =
MEMORY =
BIOS =
VDA_DISK_SIZE =
VDB_DISK_SIZE =
specs.emptyをすべてのリモートノードのパス/root/specs.txtにコピーするプレイブック/home/bob/ansible/specs.ymlを作成します。次に、specs.ymlプレイブックを使用して、リモートマシンでspecs.txtを編集し、適切なAnsibleファクトを反映します。
- A. 解決策:
- B. 解決策:
正解:B
質問 # 22
Use Ansible Galaxy with a requirements file called /home/admin/ansible/roles/
install.yml to download and install roles to /home/admin/ansible/roles from the
following URLs:
http:// classroom.example.com /role1.tar.gz The name of this role should be balancer
http:// classroom.example.com /role2.tar.gz The name of this role should be phphello
正解:
解説:
Solution as:
# pwd
/home/admin/ansible/roles
# vim install.yml
---
- src: http://classroom.example.com/role1.tar.gz
name: balancer
- src: http://classroom.example.com/role2.tar.gz
name: phphello
:wq!
# pwd
/home/admin/ansible
# ansible-galaxy install -r roles/install.yml -p roles
質問 # 23
Create a playbook called hwreport.yml that produces an output file called /root/
hwreport.txt on all managed nodes with the following information:
------------------------------------------------------------------------------------------------------
--> Inventory host name
--> Total memory in MB
--> BIOS version
--> Size of disk device vda
--> Size of disk device vdb
Each line of the output file contains a single key-value pair.
* Your playbook should:
--> Download the file hwreport.empty from the URL http://classroom.example.com/
hwreport.empty and
save it as /root/hwreport.txt
--> Modify with the correct values.
note: If a hardware item does not exist, the associated value should be set to NONE
----------------------------------------------------------------------------------------------
while practising you to create these file hear. But in exam have to download as per
questation.
hwreport.txt file consists.
my_sys=hostname
my_BIOS=biosversion
my_MEMORY=memory
my_vda=vdasize
my_vdb=vdbsize
正解:
解説:
Solution as:
# pwd
/home/admin/ansible
# vim hwreport.yml
- name:
hosts: all
ignore_errors: yes
tasks:
- name: download file
get_url:
url: http://classroom.example.com/content/ex407/hwreport.empty
dest: /root/hwreport.txt
- name: vdasize
replace:
regexp: "vdasize"
replace: "{{ ansible_facts.devices.vda.size }}"
dest: /root/hwreport.txt
register: op1
- debug:
var: op1
- name: none
replace:
regexp: "vdasize"
replace: NONE
dest: /root/hwreport.txt
when:
op1.failed == true
- name: vdbsize
replace:
regexp: "vdbsize"
replace: "{{ ansible_facts.devices.vdb.size }}"
dest: /root/hwreport.txt
register: op2
- debug:
var: op2
- name: none
replace:
regexp: "vdbsize"
replace: NONE
dest: /root/hwreport.txt
when:
op2.failed == true
- name: sysinfo
replace:
regexp: "{{item.src}}"
replace: "{{item.dest}}"
dest: /root/hwreport.txt
loop:
- src: "hostname"
dest: "{{ ansible_facts.fqdn }}"
- src: "biosversion"
dest: "{{ ansible_facts.bios_version }}"
- src: "memory"
dest: "{{ ansible_facts.memtotal_mb }}"
:wq!
# ansible-playbook hwreport.yml --syntax-check
# ansible-playbook hwreport.yml
質問 # 24
Create a playbook that changes the default target on all nodes to multi-user tarqet. Do this in playbook file called target.yml in /home/sandy/ansible
正解:
解説:
- name: change default target
hosts: all
tasks:
- name: change target
file:
src: /usr/lib/systemd/system/multi-user.target dest: /etc/systemd/system/default.target state: link
質問 # 25
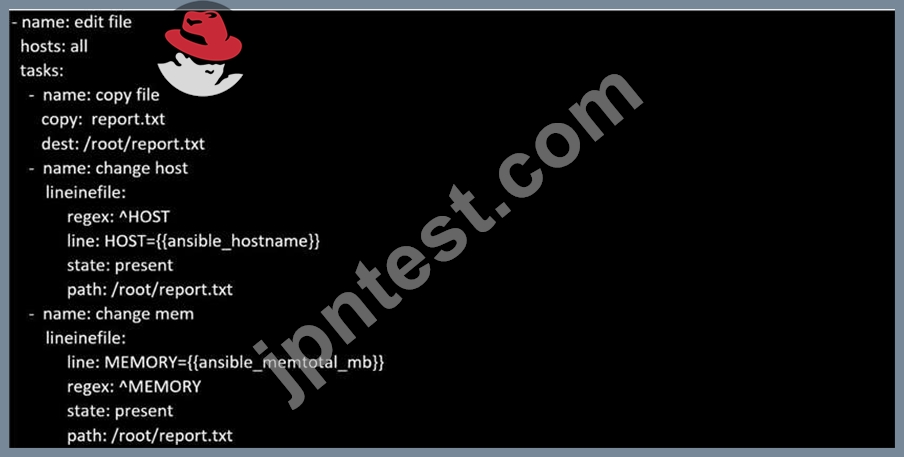
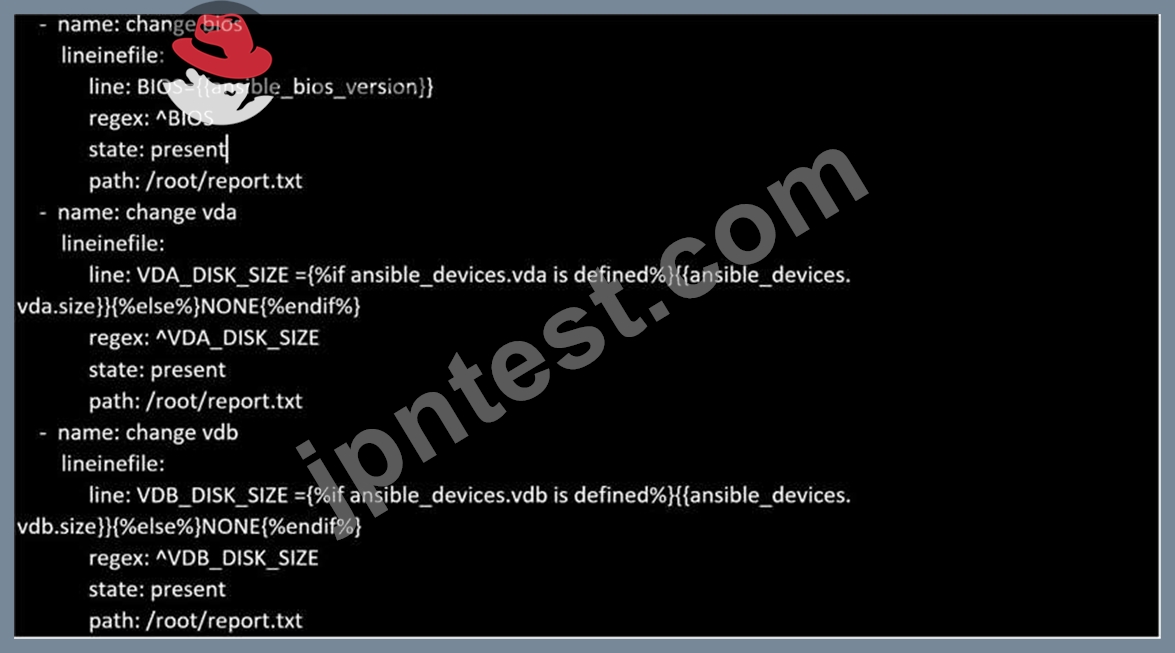
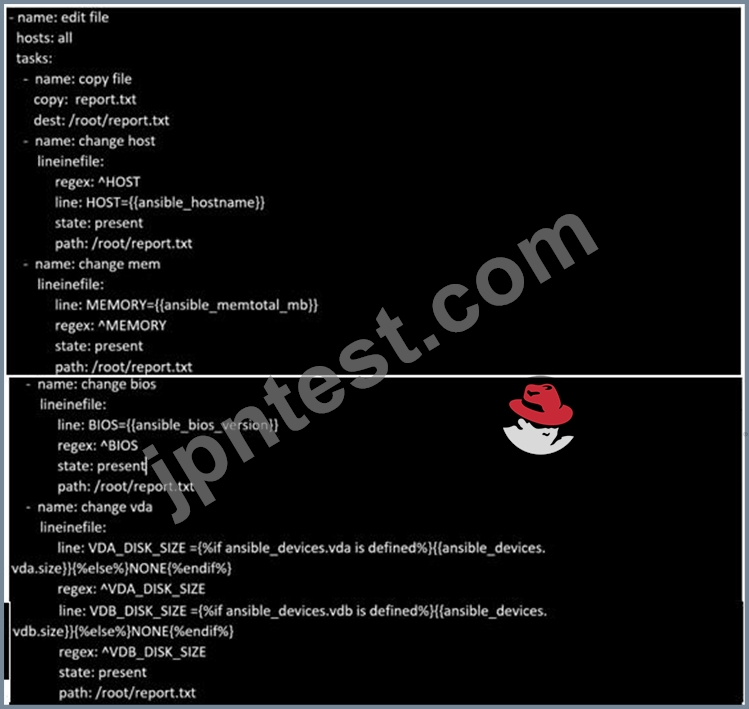
Create a file in /home/sandy/ansible/ called report.yml. Using this playbook, get a file called report.txt (make it look exactly as below). Copy this file over to all remote hosts at /root/report.txt. Then edit the lines in the file to provide the real information of the hosts. If a disk does not exist then write NONE.
正解:
解説:
Solution as:
質問 # 26
Create an Ansible vault to store user passwords as follows:
* The name of the vault is valut.yml
* The vault contains two variables as follows:
- dev_pass with value wakennym
- mgr_pass with value rocky
* The password to encrypt and decrypt the vault is atenorth
* The password is stored in the file /home/admin/ansible/password.txt
正解:
解説:
Solution as:
# pwd
/home/admin/ansible
# echo "atenorth" >password.txt
# chmod 0600 password.txt
# ansible-vault create vault.yml --vault-password-file=password.txt
---
- dev_pass: wakennym
- mgr_pass: rocky
:wq
# cat vault.yml
$ANSIBLE_VAULT;1.1;AES256
36383862376164316436353665343765643331393433373564613762666531313034336438353662
3464346331346461306337633632393563643531376139610a343531326130663266613533633562
38623439316631306463623761343939373263333134353264333834353264343934373765643737
3535303630626666370a643663366634383863393338616661666632353139306436316430616334
65386134393363643133363738656130636532346431376265613066326162643437643064313863
6633333537303334333437646163343666666132316639376531
# ansible-vault view vault.yml
password:******
---
- dev_pass: wakennym
- mgr_pass: rocky
質問 # 27
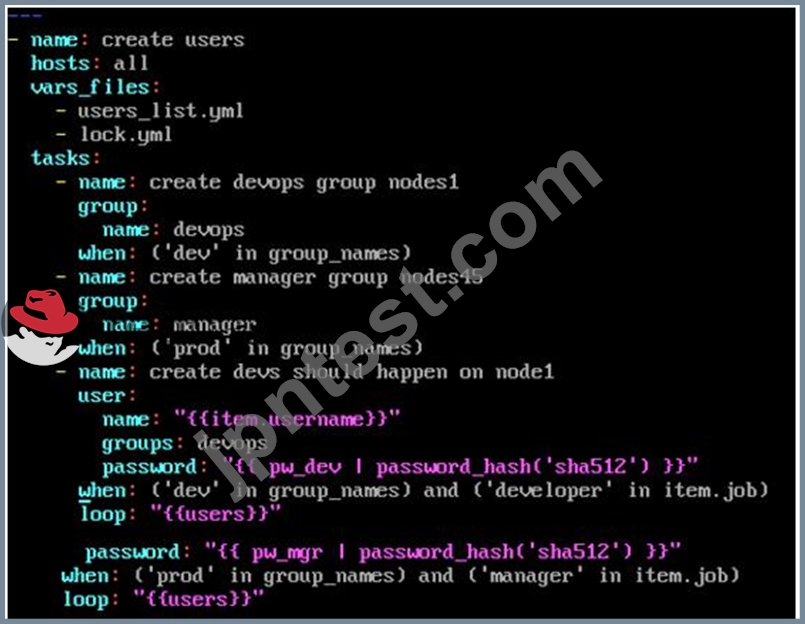
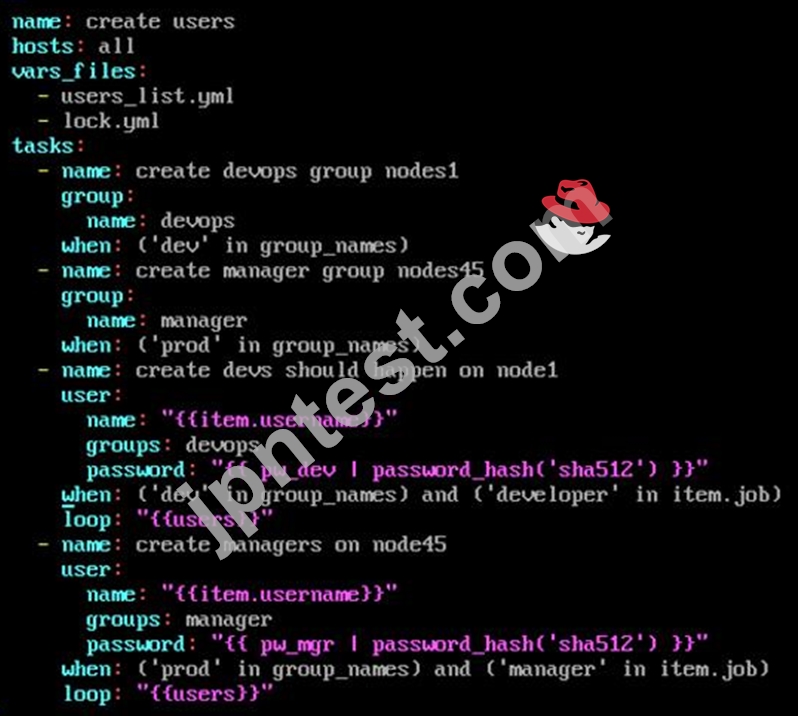
Create the users in the file usersjist.yml file provided. Do this in a playbook called users.yml located at /home/sandy/ansible. The passwords for these users should be set using the lock.yml file from TASK7. When running the playbook, the lock.yml file should be unlocked with secret.txt file from TASK 7.
All users with the job of 'developer' should be created on the dev hosts, add them to the group devops, their password should be set using the pw_dev variable. Likewise create users with the job of 'manager' on the proxy host and add the users to the group 'managers', their password should be set using the pw_mgr variable.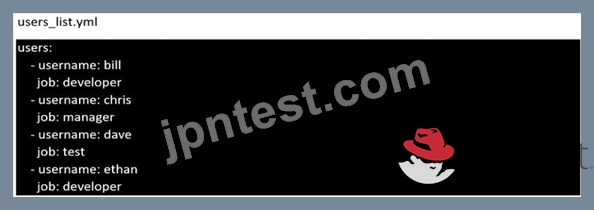
正解:
解説:
ansible-playbook users.yml -vault-password-file=secret.txt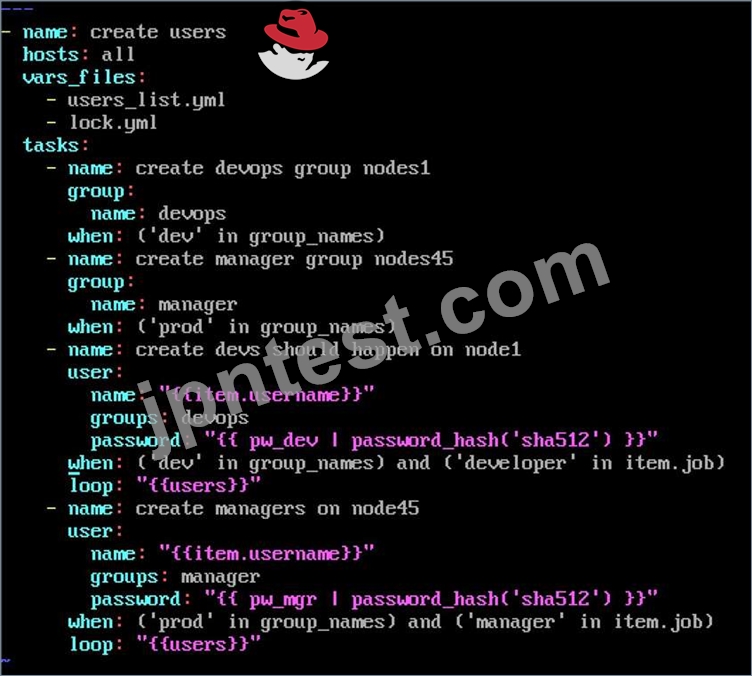
質問 # 28
Create a playbook called packages.yml that:
----------------------------------------------
--> Installs the php and mariadb packages on hosts in the dev, test, and prod host
groups.
--> Installs the Development Tools package group on hosts in the dev host group.
--> Updates all packages to the latest version on hosts in the dev host group.
正解:
解説:
Solution as:
# pwd
home/admin/ansible/
# vim packages.yml
---
- name: Install the packages
hosts: dev,test,prod
vars:
- php_pkg: php
- mariadb_pkg: mariadb
tasks:
- name: install the packages
yum:
name:
- "{{ php_pkg }}"
- "{{ mariadb_pkg }}"
state: latest
- name: install the devops tool packages
hosts: dev
tasks:
- name: install devepment tools
yum:
name: "@Development Tools"
state: latest
- name: upgrade all the packages
yum:
name: "*"
state: latest
exclude: kernel*
!wq
# ansible-playbook package.yml --syntax-check
# ansible-playbook package.yml
質問 # 29
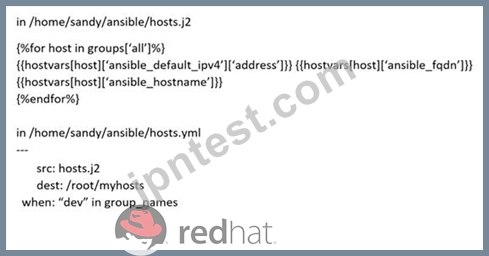
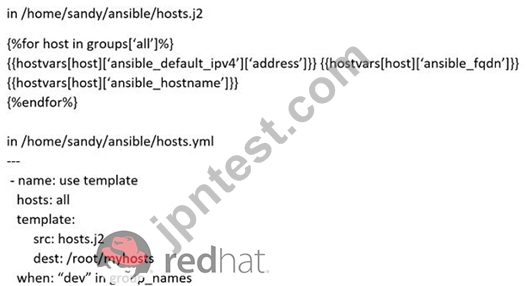
/ home / sandy / ansible /にjinjaテンプレートを作成し、hosts.j2という名前を付けます。このファイルを編集して、次のようにします。ノードの順序は重要ではありません。次に、hosts.ymlという名前のプレイブックを/ home / sandy / ansibleに作成し、テンプレートを/ root / myhostsの開発ノードにインストールします。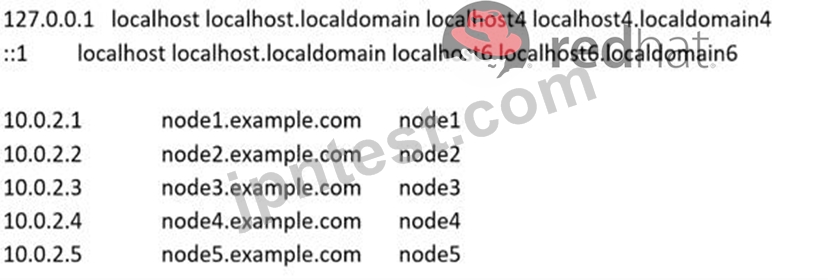
- A. 解決策:
- B. 解決策:
正解:B
質問 # 30
Install the RHEL system roles package and create a playbook called timesync.yml that:
--> Runs over all managed hosts.
--> Uses the timesync role.
--> Configures the role to use the time server 192.168.10.254 ( Hear in redhat lab
use "classroom.example.com" )
--> Configures the role to set the iburst parameter as enabled.
正解:
解説:
Solution as:
# pwd
home/admin/ansible/
# sudo yum install rhel-system-roles.noarch -y
# cd roles/
# ansible-galaxy list
# cp -r /usr/share/ansible/roles/rhelsystem-roles.timesync .
# vim timesync.yml
---
- name: timesynchronization
hosts: all
vars:
timesync_ntp_provider: chrony
timesync_ntp_servers:
- hostname: classroom.example.com _ in exam its ip-address
iburst: yes
timezone: Asia/Kolkata
roles:
- rhel-system-roles.timesync
tasks:
- name: set timezone
timezone:
name: "{{ timezone }}"
:wq!
timedatectl list-timezones | grep india
# ansible-playbook timesync.yml --syntax-check
# ansible-playbook timesync.yml
# ansible all -m shell -a 'chronyc sources -v'
# ansible all -m shell -a 'timedatectl'
# ansible all -m shell -a 'systemctl is-enabled chronyd'
質問 # 31
/ home / sandy / ansibleにmyvault.ymlという空の暗号化ファイルを作成し、パスワードをnotsafepwに設定します。パスワードをiwejfj2331に再入力します。
- A. ansible-vault create myvault.yml
新しいパスワードの作成:notsafepwパスワードの確認:notsafepw ansible-vault rekey myvault.yml現在のパスワード:notsafepw新しいパスワード:iwejfj2221パスワードの確認:iwejfj2221 - B. ansible-vault create myvault.yml
新しいパスワードの作成:notsafepwパスワードの確認:notsafepw ansible-vault rekey myvault.yml現在のパスワード:notsafepw新しいパスワード:iwejfj2331パスワードの確認:iwejfj2221
正解:A
質問 # 32
提供されたファイルusersjist.ymlファイルにユーザーを作成します。これは、/ home / sandy / ansibleにあるusers.ymlというプレイブックで行います。これらのユーザーのパスワードは、TASK7のlock.ymlファイルを使用して設定する必要があります。プレイブックを実行するときは、ロック.ymlファイルをTASK7のsecret.txtファイルでロック解除する必要があります。
'developer'のジョブを持つすべてのユーザーは、開発ホストで作成し、グループdevopsに追加する必要があります。パスワードは、pw_dev変数を使用して設定する必要があります。同様に、プロキシホストで「manager」のジョブを持つユーザーを作成し、ユーザーをグループ「managers」に追加します。パスワードは、pw_mgr変数を使用して設定する必要があります。
- A. ansible-playbook users.yml -vault-password-file = secret.txt
- B. ansible-playbook users.yml -vault-password-file = secret.txt
正解:B
質問 # 33
Create a jinja template in /home/sandy/ansible/ and name it hosts.j2. Edit this file so it looks like the one below. The order of the nodes doesn't matter. Then create a playbook in /home/sandy/ansible called hosts.yml and install the template on dev node at /root/myhosts
正解:
解説:
Solution as: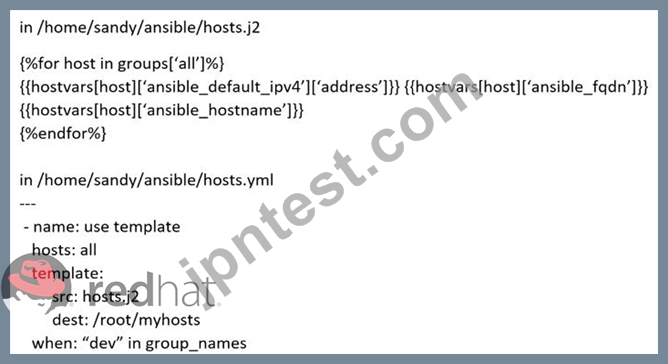
質問 # 34
すべてのインベントリホストで実行されるプレイブック/home/bob/ansible/motd.ymlを作成し、以下を文書化します。プレイブックは、次のテキストで/ etc / motdの既存のコンテンツを置き換える必要があります。 Ansibleファクトを使用して、各ホストのFQDNを表示します。開発ホストグループ内のホストでは、行は「Welcome to DevServerFQDN」である必要があります。
Webサーバーホストグループ内のホストでは、行は「Welcome to ApacheServerFQDN」である必要があります。
データベースホストグループ内のホストでは、行は「Welcome to MySQLServerFQDN」である必要があります。
- A. /home/sandy/ansible/apache.yml

/home/sandy/ansible/roles/sample-apache/tasks/main.yml - B. /home/sandy/ansible/apache.yml
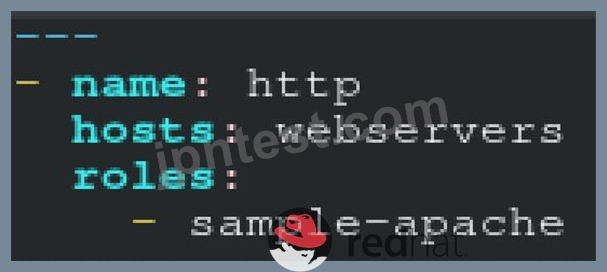
/home/sandy/ansible/roles/sample-apache/tasks/main.yml
正解:B
質問 # 35
Create a file called adhoc.sh in /home/sandy/ansible which will use adhoc commands to set up a new repository.
The name of the repo will be 'EPEL' the description 'RHEL8' the baseurl is 'https://dl.fedoraproject.org/pub/epel/epel-release-latest-8.noarch.rmp' there is no gpgcheck, but you should enable the repo.
* You should be able to use an bash script using adhoc commands to enable repos.
Depending on your lab setup, you may need to make this repo "state=absent" after you pass this task.
正解:
解説:
chmod 0777 adhoc.sh
vim adhoc.sh
#I/bin/bash
ansible all -m yum_repository -a 'name=EPEL description=RHEL8
baseurl=https://dl.fedoraproject.org/pub/epel/epel-release-latest-8.noarch.rmp
gpgcheck=no enabled=yes'
質問 # 36
......
ベストなRedHat EX294日本語学習ガイドと問題集には2023:https://www.jpntest.com/shiken/EX294-JPN-mondaishu