![]()
[2023年11月最新リリース]CKA問題集でKubernetes Administrator認証
最新の完璧なCKA問題集問題と解答で100%パスさせます
質問 # 39
Create a busybox pod and add "sleep 3600" command
正解:
解説:
kubectl run busybox --image=busybox --restart=Never -- /bin/sh -c
"sleep 3600"
質問 # 40
Create a pod with init container which waits for a service called "myservice" to be created. Once init container completes, the myapp-container should start and print a message "The app is running" and sleep for 3600 seconds.
- A. vim multi-container-pod.yaml
apiVersion: v1
kind: Pod
metadata:
name: myapp-pod
labels:
app: myapp
spec:
containers:
- name: myapp-container
image: busybox:1.28
command: ['sh', '-c', 'echo The app is running! && sleep
3600']
initContainers:
- name: init-myservice
done"]
// Check whether service called "myservice" exists
kubectl get svc
Note: Pod will not start if service called "myservice" doesn't
exist.
// Now, Create the pod
kubectl apply -f multi-container-pod.yaml - B. vim multi-container-pod.yaml
apiVersion: v1
kind: Pod
metadata:
name: myapp-pod
labels:
app: myapp
spec:
containers:
- name: myapp-container
image: busybox:1.28
command: ['sh', '-c', 'echo The app is running! && sleep
3600']
initContainers:
- name: init-myservice
image: busybox:1.28
command: ['sh', '-c', "until nslookup myservice.$(cat
/var/run/secrets/kubernetes.io/serviceaccount/namespace).s
vc.cluster.local; do echo waiting for myservice; sleep 2;
done"]
// Check whether service called "myservice" exists
kubectl get svc
Note: Pod will not start if service called "myservice" doesn't
exist.
// Now, Create the pod
kubectl apply -f multi-container-pod.yaml
正解:B
質問 # 41
Task Weight: 4%
Task
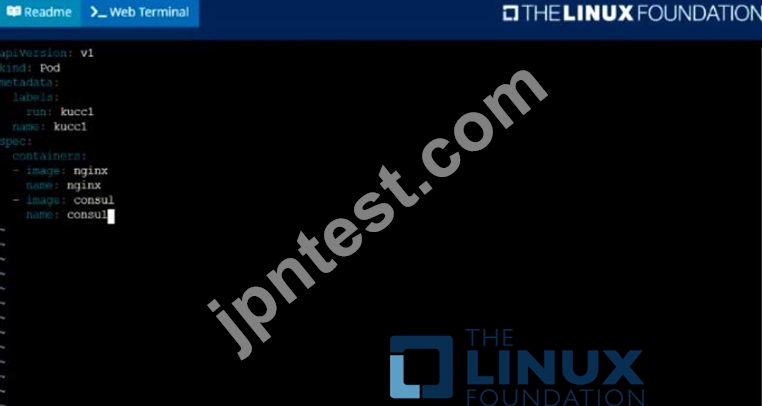
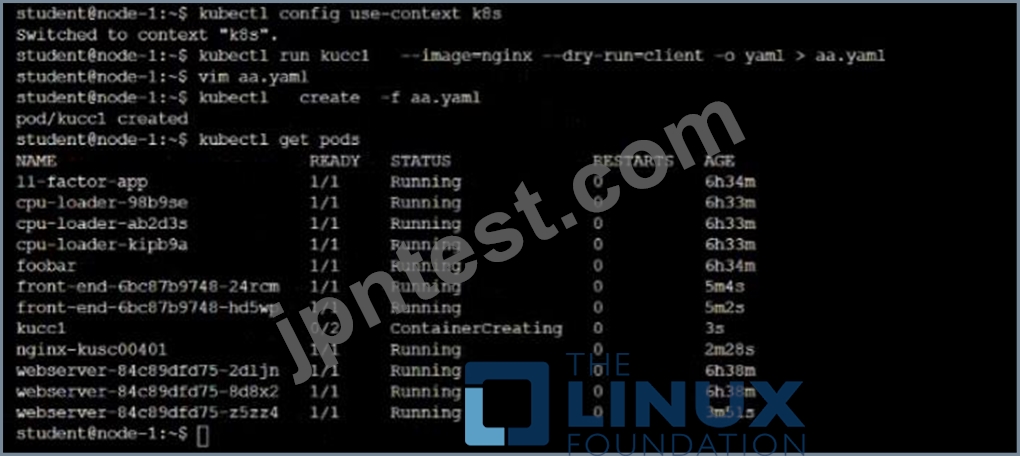
Schedule a Pod as follows:
* Name: kucc1
* App Containers: 2
* Container Name/Images:
o nginx
o consul
正解:
解説:
Solution:
質問 # 42
Get the DNS records for the service and pods for the deployment redis and the put the value in /tmp/dnsrecordpod and /tmp/dnsrecord-service
- A. // Get Pod Ip
kubectl get po -o wide
// Get Service Name
kubectl get svc
// Create a temporary pod and execute nslookup command
Note: POD IP format should be a-b-c-d and not a.b.c.d
kubectl run busybox --image=busybox:1.28 --restart=Never -
-rm -it -- nslookup 192-168-0-69.default.pod >
/tmp/dnsrecord-pod
kubectl run busybox1 --image=busybox:1.28 --restart=Never
--rm -it -- nslookup redis-service > /tmp/dnsrecordservice
//Verify
cat /tmp/dnsrecord-pod
Server: 10.2.0.10
Address 1: 10.2.0.10 kube-dns.kube system.svc.cluster.local Name: 192-168-0-69.default.pod Address 1: 192.168.0.69 192-168-0-69.redis service.default.svc.cluster.local cat /tmp/dnsrecord-pod Server: 10.2.0.10 Address 1: 10.2.0.10 kube-dns.kube system.svc.cluster.local Name: 192-168-0-69.default.pod Address 1: 192.168.0.69 192-168-0-69.redis service.default.svc.cluster.local - B. // Get Pod Ip
kubectl get po -o wide
// Get Service Name
kubectl get svc
// Create a temporary pod and execute nslookup command
Note: POD IP format should be a-b-c-d and not a.b.c.d
kubectl run busybox --image=busybox:1.28 --restart=Never -
-rm -it -- nslookup 192-168-0-69.default.pod >
/tmp/dnsrecord-pod
kubectl run busybox1 --image=busybox:1.26 --restart=Never
--rm -it -- nslookup redis-service > /tmp/dnsrecordservice
//Verify
cat /tmp/dnsrecord-pod
Server: 10.2.8.10
Address 1: 10.2.0.10 kube-dns.kube system.svc.cluster.local Name: 192-168-0-69.default.pod Address 1: 192.168.0.69 192-166-0-69.redis service.default.svc.cluster.local cat /tmp/dnsrecord-pod Server: 10.2.0.10 Address 1: 10.2.0.10 kube-dns.kube system.svc.cluster.local Name: 192-168-0-69.default.pod Address 1: 192.168.0.69 192-168-0-69.redis service.default.svc.cluster.local
正解:A
質問 # 43
List all persistent volumes sorted bycapacity, saving the fullkubectloutput to
/opt/KUCC00102/volume_list. Usekubectl 's own functionality forsorting the output, and do not manipulate it any further.
正解:
解説:
See the solution below.
Explanation
solution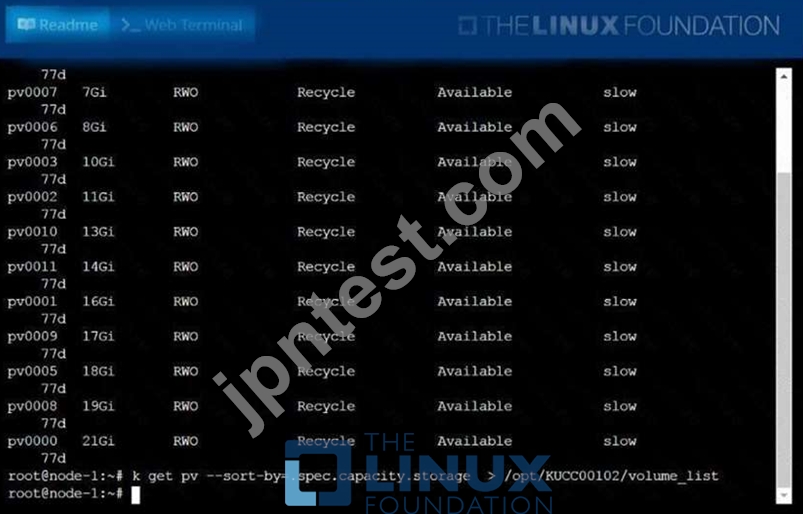
質問 # 44
What are the differences between using a service versus using an application for Security Policy match?
- A. There are no differences between "service" or "application." Use of an "application simplifies configuration by allowing use of a friendly application name instead of port numbers.
- B. Use of a "service" enables the firewall to take immediate action with the first observed packet based on port numbers. Use of an "application allows the firewall to take immediate action if the port being used is a member of the application standard port list
- C. Use of a "service" enables the firewall to take immediate action with the first observed packet based on port numbers. Use of an application allows the firewall to take action after enough packets allow for App-ID identification regardless of the ports being used
- D. Use of a "service" enables the firewall to take action after enough packets allow for App-ID identification
正解:B
質問 # 45
Create a pod with environment variables as var1=value1.Check the environment variable in pod
正解:
解説:
See the solution below.
Explanation
kubectl run nginx --image=nginx --restart=Never --env=var1=value1
# then
kubectl exec -it nginx -- env
# or
kubectl exec -it nginx -- sh -c 'echo $var1'
# or
kubectl describe po nginx | grep value1
質問 # 46
Update the deployment with the image version 1.17.4 and verify
- A. kubectl set image deploy/webapp nginx=nginx:1.17.4
//Verify
kubectl describe deploy webapp | grep Image
kubectl get deploy -o=jsonpath='{range.items [*]}{.[*]}
{.metadata.name}{"\t"}{.spec.template.spec.containers[*].i
mage}{"\n"}' - B. kubectl set image deploy/webapp nginx=nginx:1.17.4
//Verify
kubectl describe deploy webapp | grep Image
kubectl get deploy -
{.metadata.name}{"\t"}{.spec.template.spec.containers[*].i
mage}{"\n"}'
正解:A
質問 # 47
To protect your firewall and network from single source denial of service (DoS) attacks that can overwhelm its packet buffer and cause legitimate traffic to drop, you can configure:
- A. PBP (Protocol Based Protection)
- B. PGP (Packet Gateway Protocol)
- C. BGP (Border Gateway Protocol)
- D. PBP (Packet Buffer Protection)
正解:A
質問 # 48
Create the deployment redis with image=redis and expose it with "NodePort" service redis-service
- A. kubectl create deploy redis --image=redis --dry-run -o yaml >
redis-deploy.yaml
Edit redis-deploy.yaml file
vim redis-deploy.yaml
apiVersion: apps/v1
kind: Deployment
metadata:
labels:
app: redis
name: redis
spec:
replicas: 1
selector:
matchLabels:
app: redis
template:
metadata:
labels:
app: redis
spec:
containers:
- image: redis
name: redis
//Creating Service
kubectl expose deploy redis --type=NodePort --port=6379 --
target-port=6379 --name redis-service
// Verify
kubectl get deploy,svc - B. kubectl create deploy redis --image=redis --dry-run -o yaml >
redis-deploy.yaml
Edit redis-deploy.yaml file
name: redis
spec:
replicas: 1
selector:
matchLabels:
app: redis
template:
metadata:
labels:
app: redis
spec:
containers:
- image: redis
name: redis
//Creating Service
kubectl expose deploy redis --type=NodePort --port=6379 --
target-port=6379 --name redis-service
// Verify
kubectl get deploy,svc
正解:A
質問 # 49
Create an nginx pod with container Port 80 and it should only receive traffic only it checks the endpoint / on port 80 and verify and delete the pod.
- A. kubectl run nginx --image=nginx --restart=Never --port=80 --
dry-run -o yaml > nginx-pod.yaml
// add the readinessProbe section and create
vim nginx-pod.yaml
apiVersion: v1
kind: Pod
metadata:
labels:
run: nginx
name: nginx
spec:
containers:
- image: nginx
name: nginx
ports:
- containerPort: 80
readinessProbe:
httpGet:
path: /
port: 80
restartPolicy: Never
kubectl apply -f nginx-pod.yaml
// verify
kubectl describe pod nginx | grep -i readiness
kubectl delete po nginx - B. kubectl run nginx --image=nginx --restart=Never --port=80 --
dry-run -o yaml > nginx-pod.yaml
// add the readinessProbe section and create
vim nginx-pod.yaml
run: nginx
name: nginx
spec:
containers:
- image: nginx
name: nginx
ports:
- containerPort: 60
readinessProbe:
httpGet:
path: /
port: 60
restartPolicy: Never
kubectl apply -f nginx-pod.yaml
// verify
kubectl describe pod nginx | grep -i readiness
kubectl delete po nginx
正解:A
質問 # 50
Create a deployment called webapp with image nginx having 5 replicas in it, put the file in /tmp directory with named webapp.yaml
- A. //Create a file using dry run command
kubectl create deploy --image=nginx --dry-run -o yaml >
/tmp/webapp.yaml
// Now, edit file webapp.yaml and update replicas=5
apiVersion: apps/v1
kind: Deployment
metadata:
labels:
app: webapp
name: webapp
spec:
replicas: 5
selector:
matchLabels:
app: webapp
template:
metadata:
labels:
app: webapp
spec:
containers:
- image: nginx
name: nginx
Note: Search "deployment" in kubernetes.io site , you will get
the page
https://kubernetes.io/docs/concepts/workloads/controllers/deplo
yment/
// Verify the Deployment
kubectl get deploy webapp --show-labels
// Output the YAML file of the deployment webapp
kubectl get deploy webapp -o yaml - B. //Create a file using dry run command
kubectl create deploy --image=nginx --dry-run -o yaml >
/tmp/webapp.yaml
// Now, edit file webapp.yaml and update replicas=5
apiVersion: apps/v1
kind: Deployment
metadata:
labels:
app: webapp
name: webapp
spec:
replicas: 5
selector:
matchLabels:
app: webapp
template:
metadata:
labels:
Note: Search "deployment" in kubernetes.io site , you will get
the page
https://kubernetes.io/docs/concepts/workloads/controllers/deplo
yment/
// Verify the Deployment
kubectl get deploy webapp --show-labels
// Output the YAML file of the deployment webapp
kubectl get deploy webapp -o yaml
正解:A
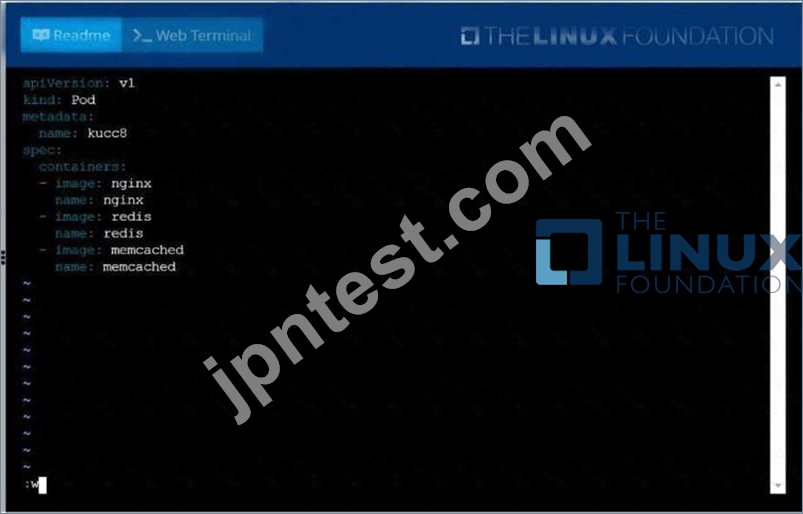
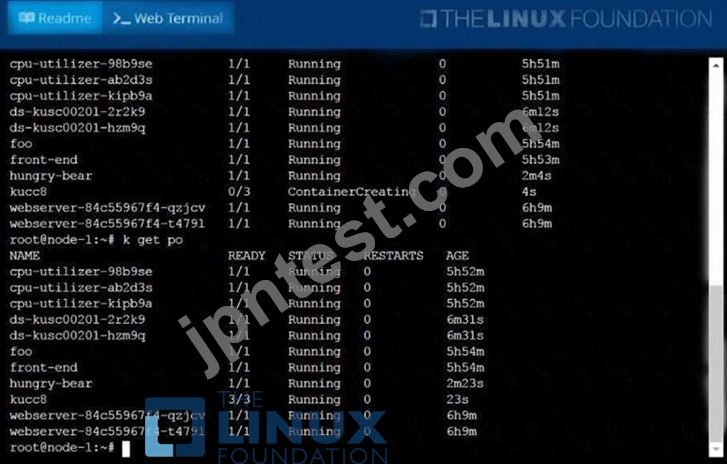
質問 # 51
Create a pod named kucc8 with a single app container for each of the
following images running inside (there may be between 1 and 4 images specified):
nginx + redis + memcached.
正解:
解説:
See the solution below.
Explanation
solution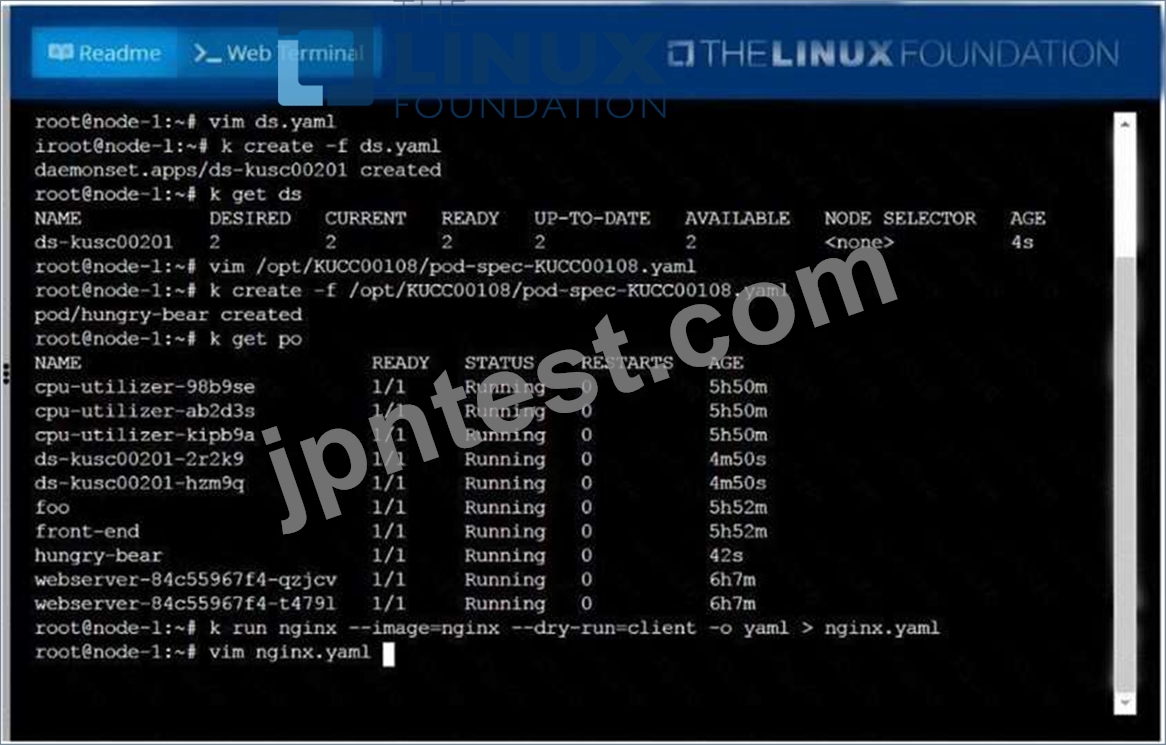
質問 # 52
Score: 4%
Task
Set the node named ek8s-node-1 as unavailable and reschedule all the pods running on it.
正解:
解説:
SOLUTION:
[student@node-1] > ssh ek8s
kubectl cordon ek8s-node-1
kubectl drain ek8s-node-1 --delete-local-data --ignore-daemonsets --force
質問 # 53
Score: 4%
Task
Schedule a pod as follows:
* Name: nginx-kusc00401
* Image: nginx
* Node selector: disk=ssd
正解:
解説:
Solution:
#yaml
apiVersion: v1
kind: Pod
metadata:
name: nginx-kusc00401
spec:
containers:
- name: nginx
image: nginx
imagePullPolicy: IfNotPresent
nodeSelector:
disk: spinning
#
kubectl create -f node-select.yaml
質問 # 54
List all configmap and secrets in the cluster in all namespace and write it to a file /opt/configmap-secret
正解:
解説:
kubectl get configmap,secrets --all-namespaces > /opt/configmap-secret // Verify Cat /opt/configmap-secret
質問 # 55
Create a NetworkPolicy which denies all ingress traffic
- A. apiVersion: networking.k8s.io/v1
kind: NetworkPolicy
metadata:
name: default-deny
spec:
podSelector: ()
policyTypes:
- Ingress - B. apiVersion: networking.k8s.io/v1
kind: NetworkPolicy
metadata:
name: default-deny
spec:
podSelector: {}
policyTypes:
- Ingress
正解:B
質問 # 56
Create a busybox pod and add "sleep 3600" command
正解:
解説:
kubectl run busybox --image=busybox --restart=Never -- /bin/sh -c "sleep 3600"
質問 # 57
Create a pod that having 3 containers in it? (Multi-Container)
- A. image=nginx, image=redis, image=consul
Name nginx container as "nginx-container"
Name redis container as "redis-container"
Name consul container as "consul-container"
Create a pod manifest file for a container and append container
section for rest of the images
kubectl run multi-container --generator=run-pod/v1 --image=nginx --
dry-run -o yaml > multi-container.yaml
# then
vim multi-container.yaml
labels:
run: multi-container
name: multi-container
spec:
containers:
- image: nginx
name: nginx-container
- image: redis
name: consul-container
restartPolicy: Always - B. image=nginx, image=redis, image=consul
Name nginx container as "nginx-container"
Name redis container as "redis-container"
Name consul container as "consul-container"
Create a pod manifest file for a container and append container
section for rest of the images
kubectl run multi-container --generator=run-pod/v1 --image=nginx --
dry-run -o yaml > multi-container.yaml
# then
vim multi-container.yaml
apiVersion: v1
kind: Pod
metadata:
labels:
run: multi-container
name: multi-container
spec:
containers:
- image: nginx
name: nginx-container
- image: redis
name: redis-container
- image: consul
name: consul-container
restartPolicy: Always
正解:B
質問 # 58
Create a pod as follows:
Name: non-persistent-redis
container Image: redis
Volume with name: cache-control
Mount path: /data/redis
The pod should launch in the staging namespace and the volume must not be persistent.
正解:
解説:
solution

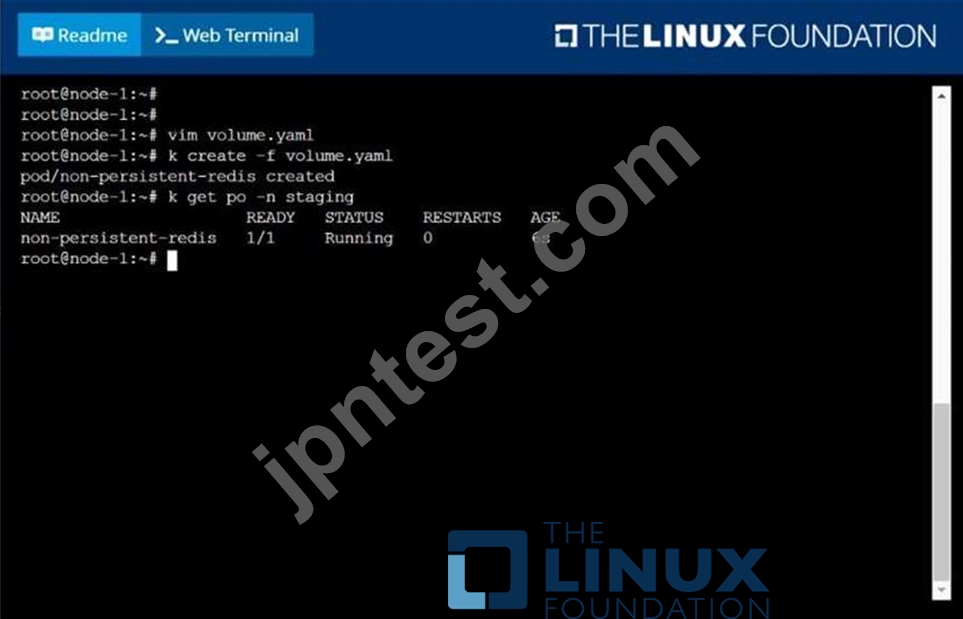
質問 # 59
Create a pod as follows:
* Name: mongo
* Using Image: mongo
* In a new Kubernetes namespace named
正解:
解説:
See the solution below.
Explanation
solution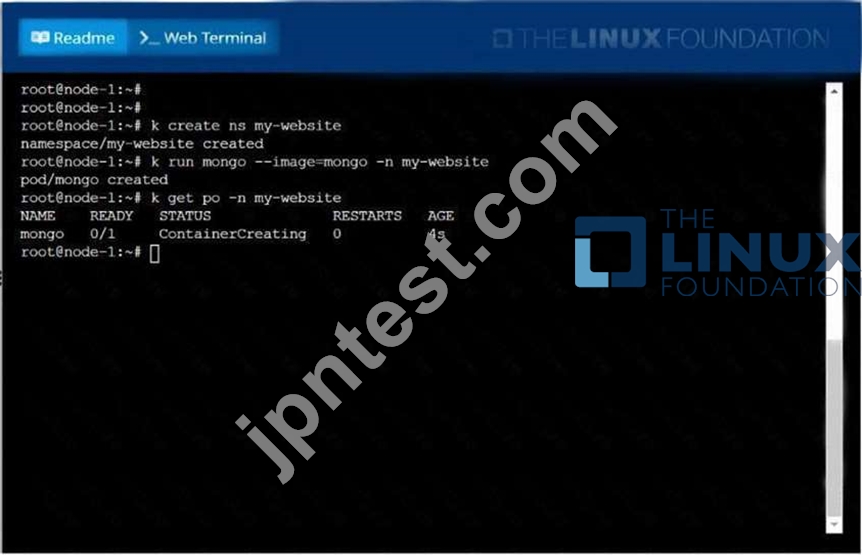
質問 # 60
......
最新のCKA試験問題集でLinux Foundation試験トレーニング:https://www.jpntest.com/shiken/CKA-mondaishu